Neon Abyss 2 Hatchmon Guide: How to Hatch, Evolve, and Build
Master the Hatchmon system in Neon Abyss 2. Learn how to hatch eggs, unlock Super Hatchmon evolutions, use the Temple of Agapeism, and build around Elise.
Published: Neon Abyss 2 Wiki Editorial Team
Table of Contents
Understanding Hatchmons in Neon Abyss 2: Mechanics and Pet Basics
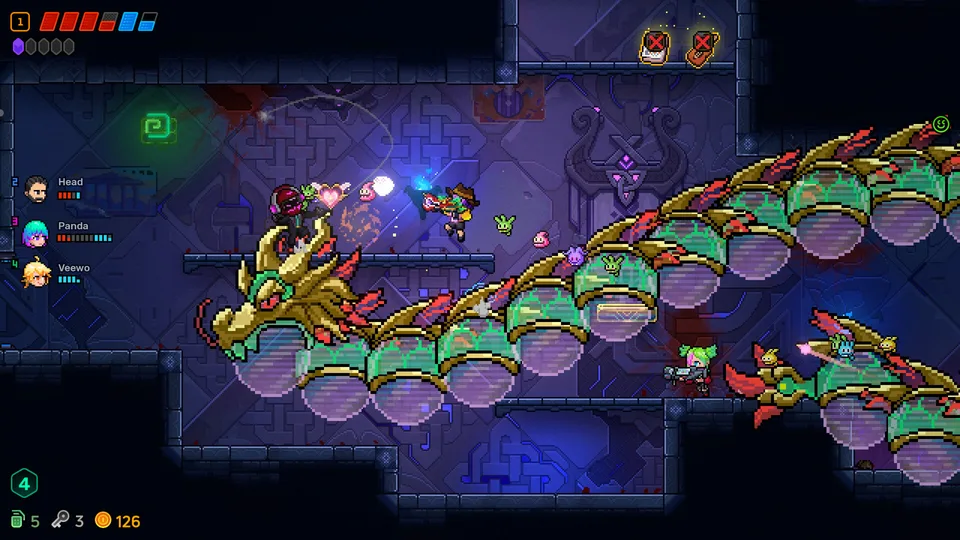
Hatchmons are AI-controlled combat companions in Neon Abyss 2 on Steam, serving as an expanded evolution of the original pet system from Veewo Games' first title. Rather than hatching directly into high-tier familiars, pets in this sequel follow a modular two-tier hierarchy: basic mini Hatchmons and fused Super Hatchmons.
While exploring rooms, your Hatchmons hover behind your selected Agent. The moment you enter a combat arena, they disperse autonomously to hunt down and shoot enemies without requiring manual targeting. Because Neon Abyss 2 is in Steam Early Access, developers frequently balance pet health pools and movement speeds across incremental patches.
Unlike the immortal familiars found in conventional roguelikes, Hatchmons possess tangible hitboxes. When taking enemy fire or colliding with hazards, they are knocked unconscious and collapse onto the floor. Unconscious Hatchmons stop attacking until revived. To bring them back into action, you must physically sprint over their bodies during combat.
Tip
Reduce Visual Noise in Settings: Having a dozen mini pets and Super Hatchmons trailing behind you can clutter combat arenas. You can open the in-game Settings menu to cap the maximum number of Hatchmons rendered on screen. Your hidden companions still fire their weapons and provide stat bonuses normally.
Equipment synergy represents the most impactful aspect of the companion system. Multiple weapons, relics, and character traits scale their offensive output directly against the number of active Hatchmons or unhatched eggs in your inventory. Managing your companions effectively turns a chaotic run into an automated boss-shredding engine.
How to Find and Hatch Hatchmon Eggs
Building a formidable squad starts with collecting and incubating eggs. Eggs act as pending Hatchmon containers that trail behind your character until specific room-clear conditions are met.
Community reports and game data identify several primary methods for securing eggs during a run:
Destroying Environment Props: Smashing wooden crates and ceramic vases scattered across floor layouts is the most consistent free source of eggs.
Room Clear Rewards: Certain challenge rooms and standard combat arenas award an egg upon eliminating all enemy waves.
Chests and Containers: Standard, locked, and stone chests carry a random chance to yield an egg alongside gold or crystals.
The Temple of Shopping: Store rooms regularly stock random eggs for purchase using gold.
Agent Loadouts: Certain Agents, such as Elise, begin runs with assigned companions already active.
Once collected, an egg requires incubation. Hatching operates through passive room progression rather than time limits. On average, an egg requires clearing 3 to 4 hostile rooms before cracking open.
Warning
Hatching Failure Chance: Eggs carry an inherent failure rate. An egg may occasionally break and yield nothing upon completing its incubation period. However, a successful hatch always triggers an on-screen notification displaying the specific mini Hatchmon added to your squad.
How to Incubate and Hatch Eggs Fast
Identify the Egg Base Color: Egg shell patterns vary (such as stripes or dots), but the base color alone dictates the resulting mini variant: pink yields Pinky, green yields Limey, purple yields Purply, blue yields Tealy, and yellow yields Ivory.
Clear Combat Chambers: Clear standard enemy rooms sequentially. Avoid wasting time in empty corridors, as only hostile room completions count toward the hatch counter.
Trigger In-Run Hatching Accelerators: Acquire specialized artifacts like the Dinosaur Skull to decrease required room counts, or pick up weapon upgrades that advance hatching timers whenever you collect crystals or trigger explosions.
Inspect Hatch Notifications: Once the hatch completes, check the notification banner to see which color was added toward your next four-unit evolution recipe.
The Temple of Agapeism: Dedicated Hatchmon Faith Path
In Neon Abyss 2, the Faith system introduces branching run mechanics chosen at the Pillar of Faith found at the start of every floor. While the default Faith path focuses on Consumerism (scaling with gold spent), companion-focused runs benefit enormously from Agapeism.
To unlock Agapeism, you must complete the first page of the permanent Evolution Skill Tree back at the hub and unlock the Agapeism perk situated on the second page. Once active, selecting Agapeism at the Pillar of Faith alters your resource generation across the entire floor.
Complete Evolution Tree page one in the hub meta-progression menu.
Purchase the Agapeism perk node on page two.
Select Agapeism at the floor entrance Pillar of Faith.
Damage the floating Agapeism Proxy whenever it spawns to harvest bonus eggs.
Accumulate faith points by picking up and hatching eggs to charge the teleporter.
Inside the Temple of Agapeism, you gain access to exclusive pet-management tools:
Egg Dispensers: Purchase guaranteed eggs for 15 Gold each, bypassing the random drop rate of normal shop floors.
Egg Exchange: Trade excess unhatched eggs for immediate gold payouts if you need emergency currency for key shop items.
The Agapeism Machine: A central contraption that allows you to deposit multiple eggs at once to hatch them instantly, skipping the standard 3-to-4 room combat requirement entirely.
Leaving the Temple causes the portal to close for that floor, but maintaining Agapeism on subsequent floors lets you re-enter whenever your faith gauge is filled.
Mini Hatchmon Variants and Unique Companions
The Hatchmon roster divides into five core mini variants capable of fusing, alongside unique, non-evolving companions tied to specific equipment or Agents.
Pinky (Mini Variant)
Hatches from pink-colored eggs. Pinky serves as the primary offensive base for projectile-heavy evolutions and features eight distinct Super Hatchmon fusion paths.
Limey (Mini Variant)
Hatches from green-colored eggs. Limey provides high compatibility with utility and critical-strike evolutions, sporting seven documented fusion recipes.
Purply (Mini Variant)
Hatches from purple-colored eggs. Purply links directly with survival and movement-oriented evolutions, including ghost shields and extra jumps.
Tealy (Mini Variant)
Hatches from blue-colored eggs. Tealy focuses heavily on aura buffs, Faith safety perks, and golden wave damage triggers.
Ivory (Mini Variant)
Hatches from yellow-colored eggs. Ivory anchors damage-scaling, item-splitting, and explosive fusion archetypes across four primary recipes.
Kiddy (Unique Pet)
Exclusive companion accompanying Agent Elise. Kiddy cannot be evolved, but automatically roams the arena waking up unconscious Hatchmons without requiring you to run over them.
Grabie (Unique Pet)
Acquired immediately upon taking a bank loan inside the Temple of Shopping. Grabie attacks infrequently, instead hoovering up dropped floor coins to pay down your outstanding debt.
Feary & Skely (Weapon Pets)
Unique companions bound to specific armaments. Feary spawns while wielding the Noxmare firearm, while Skely summons alongside the RITUAL melee blade. Neither can fuse.
If your current lineup contains unwanted duplicate minis that block your target fusion recipes, search for Color Changing Machines in shop corridors. For a modest gold fee, these stations swap a selected mini Hatchmon's color, giving you precise control over your next fusion.
Super Hatchmon Evolution Recipes and Abilities
When your active roster collects the exact combination of four mini Hatchmons required for an evolution, they instantly merge into a Super Hatchmon. Super Hatchmons deal significantly higher base damage and provide potent passive or active abilities.
You can review unlocked fusion silhouettes in your in-game Hatchmon Booklet, but the recipes below outline verified combinations and their mechanical payoffs based on community testing:
Super Hatchmon
Required Combination
Unique Ability / Combat Effect
Huffie
3 Ivory + 1 Pinky
Taking damage increases his attack power for the remainder of the floor.
Snippie
1 Ivory + 3 Pinky
Automatically splits dropped item bundles into smaller units (e.g., crystal clusters into loose crystals).
Vitalie
3 Purply + 1 Tealy
Starts as a ghost; absorbs loose hearts to manifest physically. Once charged, absorbs a fatal blow to save you from death.
Wackie
2 Tealy + 2 Ivory
Hurls Clown Bombs at targets; triggers an explosive bomb barrage whenever revived from unconsciousness.
Quartzie
3 Pinky + 1 Limey
Duplicates the active effect of your equipped Curio without consuming additional crystal charges.
Cloudie
3 Purply + 1 Limey
Grants one additional jump to your Agent and periodically drops temporary Jump Marks inside combat rooms.
Devotie
3 Tealy + 1 Pinky
Completely negates the health-damage penalty usually incurred when switching Faith paths at the Pillar of Faith.
Groovie
1 Pinky + 3 Limey
Emits a green searchlight during combat; while standing inside the beam, all your weapon shots deal guaranteed critical hits.
Lumine
2 Tealy + 2 Pinky
Projects an illuminating aura during combat; firing through this halo grants a massive multiplicative damage increase.
Goldie
3 Tealy + 1 Ivory
Scatters Golden Glitters in battle and releases an expansive damaging golden wave whenever revived.
Runie
2 Ivory + 2 Pinky
Conjures runestones in the room if none exist, then detonates existing runestones for heavy burst damage.
Player experience shows that evolutions trigger strictly on matching four-part formulas. If you hold three Purply minis and lack the single Tealy required for Vitalie, the minis will remain in their base forms indefinitely until the fourth component hatches or is converted.
Best Character and Synergy Builds: Elise and Scaling Weapons
Maximizing the Hatchmon system requires pairing your companions with characters and armaments designed to leverage pet density.
Agent Elise: The White Tree Specialist
Elise represents the premier Hatchmon commander in Neon Abyss 2. As a senior warrior of the White Tree faction, she enters runs with a dedicated companion, Kiddy.
In intense boss encounters—such as facing Molly, Goddess of Blind Box, or Talos, the God of AI—bosses unleash room-wide projectile sweeps that quickly knock out standard Hatchmons. Because Kiddy automatically revives fallen companions, Elise maintains continuous pet uptime without forcing you to abandon safe dodging positions.
Scaling Armaments and the Vaporization Mechanic
Elise begins runs equipped with Warming, a firearm built specifically around companion scaling:
Homing Projectile Scaling: Warming periodically fires homing rounds. The total number of homing projectiles released per volley scales upwards with every Hatchmon in your squad.
Sweet Talk Alternative: Another companion-focused ranged weapon, Sweet Talk, unleashes a "cuteness blast" and homing projectiles whenever you strike targets or awaken downed Hatchmons.
Weapon Vaporization:Neon Abyss 2 replaces direct weapon discarding with a vaporization system. Breaking down unwanted dropped weapons (such as Furry Sam or Prism) yields weapon experience.
Leveling up your primary companion firearm through vaporization unlocks critical perk choices. Players should prioritize milestones that trigger chain lightning, spawn digital squares, or advance egg-hatching progress every time crystals or explosions occur.
Recommended Artifact Synergies
Complement your pet build by prioritizing items that reward high companion counts and multi-jump mobility:
Tenacious Sapling: Periodically revives unconscious Hatchmons automatically, functioning as a secondary safety net alongside Kiddy.
Beetle Charm: Grants an extra baseline jump and awards Jump Boxes after breaking wooden crates—allowing you to stay airborne above boss attacks while your pets engage below.
Alien Poster: Drops an egg every time your Agent sustains damage, and showers your inventory with six silver eggs if your health reaches death's door.
Mr. Moment: Causes awakened Hatchmons to periodically drop keys upon being revived, solving locked-door resource bottlenecks in late-game stages.
Frequently Asked Questions
Do unhatched eggs count toward weapon scaling that requires Hatchmons?
No. Gameplay testing confirms that weapons like Warming scale their bonus homing projectiles strictly from fully hatched mini Hatchmons, Super Hatchmons, or unique pets like Grabie. Unhatched eggs trailing your character do not boost weapon output until they fully hatch.
Can I have more than one Super Hatchmon active at the same time?
Yes. There is no hard limit on the total number of Hatchmons or Super Hatchmons you can command simultaneously. As long as you assemble the correct four-unit combinations of mini Hatchmons, they will fuse into distinct Super Hatchmons, stacking their passive and active effects.
What happens if my Hatchmons are knocked out during a boss fight?
When knocked out, Hatchmons lie immobilized on the floor and cease firing. They do not permanently die or disappear from your inventory. You can restore them to full combat capability by running over their bodies, having Kiddy revive them, or waiting for relic triggers like Tenacious Sapling to reactivate them.
Why haven't my duplicate mini Hatchmons fused yet?
Fusion requires an exact recipe of four specific mini Hatchmons. Holding four or five duplicate minis of a single color (like five Purply) will not trigger an evolution unless that exact single-color recipe exists in the booklet. Check the Hatchmon Booklet in your pause menu to verify which complementary colors are needed to complete the fusion.